# Windows
# # Updating Saved Passwords for Network Drives and Printers
If you have recently changed your `@education` or `@schools` password, you may need to update the saved password in **Credential Manager** to regain access to your network drives and printers.
---
# Windows Instructions
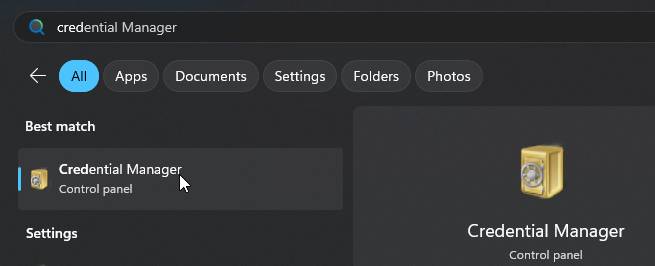
## Step 1 — Open Credential Manager
1. Open the **Start Menu**
2. Search for **Credential Manager**
3. Open the app
[](https://kb.wrc.vic.edu.au/uploads/images/gallery/2026-05/41mmaAsZ3ZzGGUWo-image-1778645823374.jpeg)
---
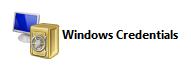
## Step 2 — Open Windows Credentials
Click **Windows Credentials**.
[](https://kb.wrc.vic.edu.au/uploads/images/gallery/2026-05/SrhtCRSru7u5qFE3-image-1778645840924.jpeg)
---
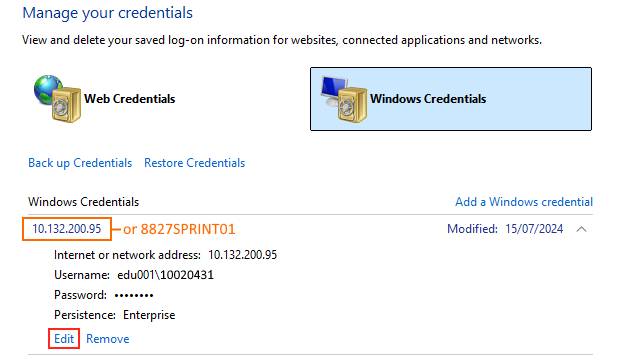
## Step 3 — Find Saved Network Drive and Printer Credentials
Look for entries named:
- `10.132.200.95`
- `8827SPRINT01`
- Any other entries starting with:
- `10.132`
- `8827`
These entries may be used for network drives and printer access.
Click each entry to expand it, then click **Edit**.
[](https://kb.wrc.vic.edu.au/uploads/images/gallery/2026-05/gvJ9nKPMSNytaa1Q-image-1778645864502.jpeg)
---
## Step 4 — Update Your Password
Update the password field using your **new** `@education` or `@schools` password.
[](https://kb.wrc.vic.edu.au/uploads/images/gallery/2026-05/Gl9PCQMSeBduy3BX-image-1778645906706.jpeg)
### Username Format
#### Staff
```text
edu001\username
```
#### Students
```text
edu002\username
```
Click **Save** when finished.
---
# Finished
Your network drives and printers should now reconnect correctly.
If you still have issues:
- Restart your laptop
- Try printing again
- Check your network drive access
- Contact the IT Department if the problem continues
# Add an email account to Outlook
Windows
# Back up your folders with OneDrive
Windows
[https://support.microsoft.com/en-us/office/back-up-your-folders-with-onedrive-d61a7930-a6fb-4b95-b28a-6552e77c3057](https://support.microsoft.com/en-us/office/back-up-your-folders-with-onedrive-d61a7930-a6fb-4b95-b28a-6552e77c3057)
# Create and add an email signature in Outlook
[Create and add an email signature in Outlook - Microsoft Support](https://support.microsoft.com/en-us/office/create-and-add-an-email-signature-in-outlook-8ee5d4f4-68fd-464a-a1c1-0e1c80bb27f2#ID0EDBF=Classic_Outlook)
# Device encryption in Windows
[https://support.microsoft.com/en-us/windows/device-encryption-in-windows-ad5dcf4b-dbe0-2331-228f-7925c2a3012d](https://support.microsoft.com/en-us/windows/device-encryption-in-windows-ad5dcf4b-dbe0-2331-228f-7925c2a3012d)
# Finding your BitLocker recovery key in Windows
[https://support.microsoft.com/en-us/windows/finding-your-bitlocker-recovery-key-in-windows-6b71ad27-0b89-ea08-f143-056f5ab347d6](https://support.microsoft.com/en-us/windows/finding-your-bitlocker-recovery-key-in-windows-6b71ad27-0b89-ea08-f143-056f5ab347d6)
# How to add SharePoint document library to file explorer
[https://www.youtube.com/watch?v=ihyvGX3MGUM](https://www.youtube.com/watch?v=ihyvGX3MGUM "https://www.youtube.com/watch?v=ihyvGX3MGUM")
# How to Delete a Saved Wi-Fi Network on Windows
[https://www.howtogeek.com/246104/how-to-delete-a-saved-wi-fi-network-on-windows-10/](https://www.howtogeek.com/246104/how-to-delete-a-saved-wi-fi-network-on-windows-10/)
# How to Disable BitLocker Encryption on Windows 10 and 11
[https://www.howtogeek.com/805225/disable-bitlocker/](https://www.howtogeek.com/805225/disable-bitlocker/)
# How To Fix The app you're trying to install isn't a Microsoft-verified app On Windows 11
[How To Fix The app you're trying to install isn't a Microsoft-verified app On Windows 11 (youtube.com)](https://www.youtube.com/watch?v=M5egJCJlq7M)
# How to Install Printer Windows
**You must be on Campus to install printers.**
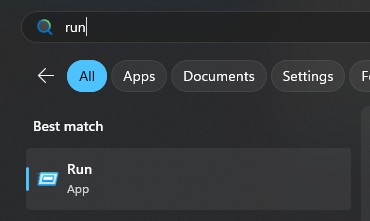
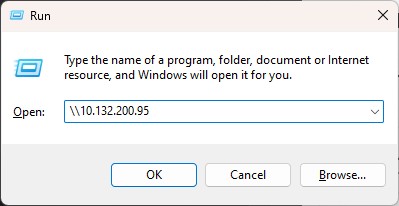
1. Open the Run dialog: Press the Windows key and the letter "R" together (Win+R), or search for run in the Windows start menu.
2. In the Run dialog box, type **\\\\10.132.200.95** and click OK. This will connect you to the print server.
3. Enter username and password: You will be prompted to enter your username and password.
- **Staff**: edu00**1**\\tonumber and your DE password.
- **Students**: edu00**2**\\username and your DE password.
Tick **Remember my credentials**.
[](https://kb.wrc.vic.edu.au/uploads/images/gallery/2024-10/Jhmimage.png)
4. File Explorer will open: Once you've entered the correct credentials, File Explorer will open, and you'll see a list of available printers.
Double click the 8827-Follow-Me print queue. This will initiate the installation process for the printer on your device.
# How to Map a Network Share to a Drive Letter
🧰 What You’ll Need:
- The path to the network share (e.g., `\\servername\sharename`)
- Optional: Username/password if required by the network share
## 🔹 Step 1: Open File Explorer / This PC
**Instructions:**
- Press `Windows + E` to open **File Explorer**
- Or click the **folder icon** in the taskbar
- If you are not already in there, In the left-hand sidebar, click on **This PC**
[ ](https://kb.wrc.vic.edu.au/uploads/images/gallery/2025-06/3Xoimage.png) [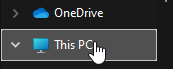](https://kb.wrc.vic.edu.au/uploads/images/gallery/2025-06/Lcaimage.png)
---
## 🔹 Step 2: Click "Map Network Drive"
**Instructions:**
- In the top toolbar, click on the **three-dot menu** (`...`)
- Choose **"Map network drive"**
[](https://kb.wrc.vic.edu.au/uploads/images/gallery/2025-06/Mhgimage.png)[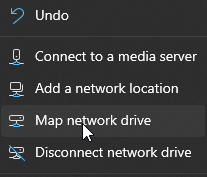](https://kb.wrc.vic.edu.au/uploads/images/gallery/2025-06/3QDimage.png)
---
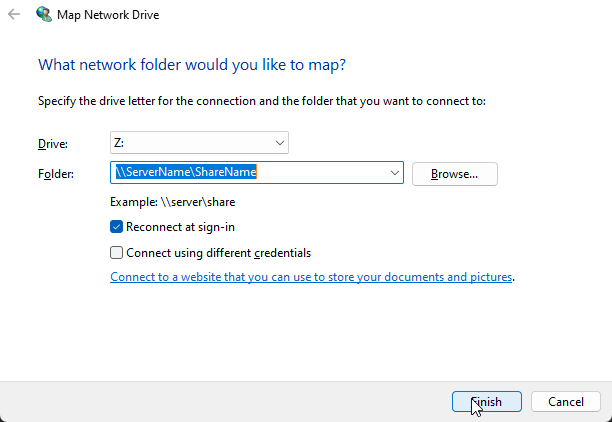
## 🔹 Step 3: Choose Drive Letter and Folder Path
**Instructions:**
- Select an available **Drive Letter** (like `Z:`)
- In the **Folder** field, type the path to the network share (e.g., `\\ServerName\ShareName`)
- Optionally, check:
- ✅ **Reconnect at sign-in** if you want it to persist
- ✅ **Connect using different credentials** if needed
[](https://kb.wrc.vic.edu.au/uploads/images/gallery/2025-06/xLFimage.png)
---
## 🔹 Step 4: Enter Network Credentials (if prompted)
**Instructions:**
- If the share requires a username/password, a login prompt will appear.
- Enter your **credentials**, and check **Remember my credentials** if you don’t want to enter them every time.
[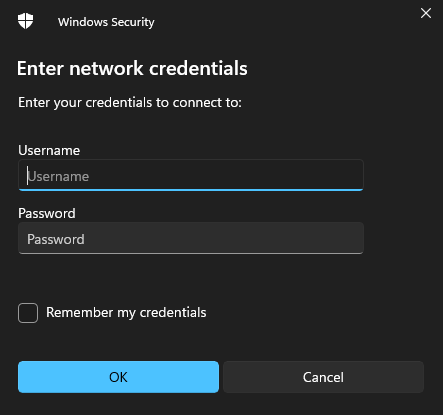](https://kb.wrc.vic.edu.au/uploads/images/gallery/2025-06/VfNimage.png)
---
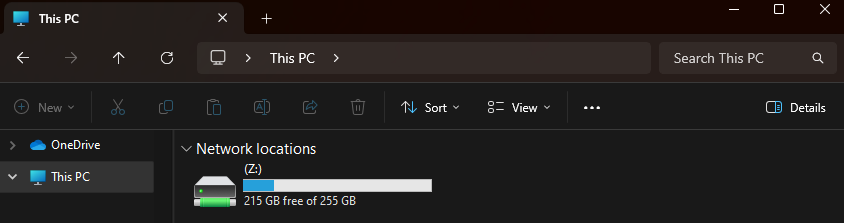
## 🔹 Step 5: Access the Mapped Drive
**Instructions:**
- You’ll now see the new drive in **This PC** under **Network Locations**
- You can open it just like any other folder / drive.
[](https://kb.wrc.vic.edu.au/uploads/images/gallery/2025-06/SE1image.png)
---
## ✅ Done!
You’ve successfully mapped a network drive to a drive letter in Windows 11. It will now show up in File Explorer every time you log in (if you selected the “Reconnect at sign-in” option).
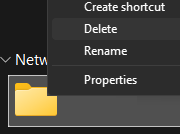
If you want to remove this mapped drive at any time, simply **right click** it and choose **disconnect**.
[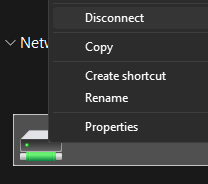](https://kb.wrc.vic.edu.au/uploads/images/gallery/2025-06/ZnMimage.png)
# How to Map a Network Share to a Folder
🧰 What You’ll Need:
- The path to the network share (e.g., `\\servername\sharename`)
- Optional: Username/password if required by the network share
## 🔹 Step 1: Open File Explorer / This PC
**Instructions:**
- Press `Windows + E` to open **File Explorer**
- Or click the **folder icon** in the taskbar
- If you are not already in there, In the left-hand sidebar, click on **This PC**
[ ](https://kb.wrc.vic.edu.au/uploads/images/gallery/2025-06/3Xoimage.png) [](https://kb.wrc.vic.edu.au/uploads/images/gallery/2025-06/Lcaimage.png)
---
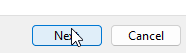
## 🔹 Step 2: Click "Add a network location"
**Instructions:**
- In the top toolbar, click on the **three-dot menu** (`...`)
- Choose **"Add a network location"**
[](https://kb.wrc.vic.edu.au/uploads/images/gallery/2025-06/Mhgimage.png)[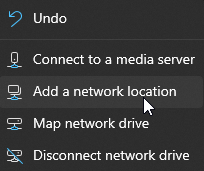](https://kb.wrc.vic.edu.au/uploads/images/gallery/2025-06/Xf9image.png)
---
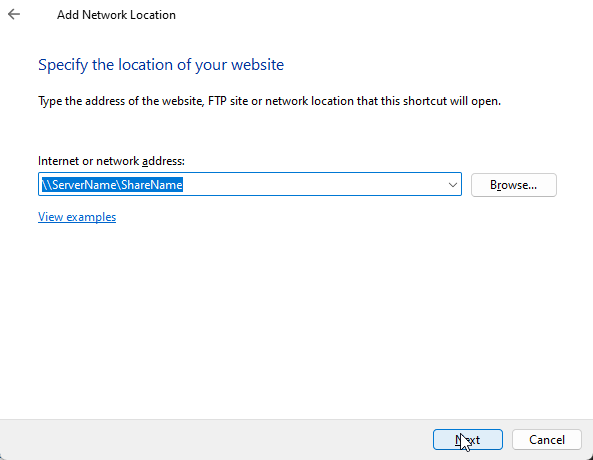
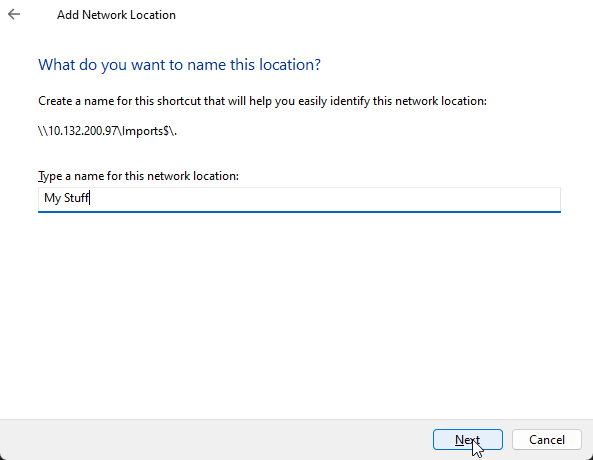
## 🔹 Step 3: Choose Folder Path and Name
**Instructions:**
- Follow the prompts. Click next, then next again.
- In the **Internet or network address** field, type the path to the network share (e.g., `\\ServerName\ShareName`)
- Click **next**, then choose a **Name** to call the folder.
- Click **next** and then **finish**.
[](https://kb.wrc.vic.edu.au/uploads/images/gallery/2025-06/NR4image.png)
[](https://kb.wrc.vic.edu.au/uploads/images/gallery/2025-06/7Tkimage.png)
[](https://kb.wrc.vic.edu.au/uploads/images/gallery/2025-06/W1rimage.png)
---
## 🔹 Step 4: Enter Network Credentials (if prompted)
**Instructions:**
- If the share requires a username/password, a login prompt will appear.
- Enter your **credentials**, and check **Remember my credentials** if you don’t want to enter them every time.
[](https://kb.wrc.vic.edu.au/uploads/images/gallery/2025-06/VfNimage.png)
---
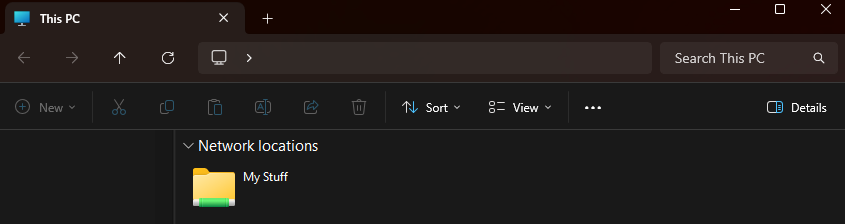
## 🔹 Step 5: Access the Mapped Folder
**Instructions:**
- You’ll now see the new folder in **This PC** under **Network Locations**
- You can open it just like any other folder / drive.
[](https://kb.wrc.vic.edu.au/uploads/images/gallery/2025-06/DHJimage.png)
---
## ✅ Done!
You’ve successfully mapped a network drive to a folder in Windows 11. It will now show up in File Explorer every time you log in.
If you want to remove this mapped folder at any time, simply **delete** it like you would any other folder.
[](https://kb.wrc.vic.edu.au/uploads/images/gallery/2025-06/Afyimage.png)
# OneDrive sync problems
[https://support.microsoft.com/en-us/office/fix-onedrive-sync-problems-0899b115-05f7-45ec-95b2-e4cc8c4670b2](https://support.microsoft.com/en-us/office/fix-onedrive-sync-problems-0899b115-05f7-45ec-95b2-e4cc8c4670b2)
# Switching out of Windows S mode
[https://support.microsoft.com/en-us/windows/switching-out-of-s-mode-in-windows-4f56d9be-99ec-6983-119f-031bfb28a307](https://support.microsoft.com/en-us/windows/switching-out-of-s-mode-in-windows-4f56d9be-99ec-6983-119f-031bfb28a307 "https://support.microsoft.com/en-us/windows/switching-out-of-s-mode-in-windows-4f56d9be-99ec-6983-119f-031bfb28a307")
# Task Manager No Longer opening after running NAPLAN
1. Press `Win + R`, type `regedit`.
2. Navigate to:
`HKEY_CURRENT_USER\Software\Microsoft\Windows\CurrentVersion\Policies\System`
3. Look for a value named `DisableTaskMgr` and delete it or set it to `0`.
# Touch Screen stopped working after running NAPLAN
1. Press Win + R, type regedit, and go to:
HKEY\_CURRENT\_USER\\Software\\Microsoft\\Wisp\\Touch
Look for TouchGate and ensure it's set to 1 (or delete it if unsure).
Restart your PC.